Growing Garlic
HOW TO PLANT, WEED, HARVEST, CURE, AND STORE GARLIC
Hardneck garlic has thrived for millennia in the northern hemisphere in a wide range of soil conditions and climates. With a little patience and a few bulbs, you can build up a sizable crop. The cloves are broken off of the bulb and planted in the fall. The cold of winter, also known as vernalization, prompts the clove to break open after a period of dormancy. The mature plant is harvested the following year, in late July. Here is a thumbnail sketch on growing garlic, good for both a tiny patch with a single clove or a field with up to five hundred plants.
Each step, from planting to weeding and harvesting, is done by hand. This is how to do it:
- Inspect and prepare your soil
- Plant cloves in the fall
- Mulch for winter
- Spring chores
- Summer harvest and curing
Inspect and Prepare Your Soil
All soil is made up of finely ground rock particles, created over millions of years, plus living and dead organic matter. It is the size of the particles— from the large particles of sand to the very fine ones found in clay—as well as the presence of minerals and organic matter, that characterizes each soil type. Each type presents specific advantages and disadvantages for growing vegetables, including garlic.
Sandy soil is light and crumbly, or friable. This means garlic bulbs can be harvested with minimal effort. But it’s also porous, with lots of space between each particle of sand (imagine the space between beach balls). It cannot retain nutrients and moisture as well as other soil types. However, bulbs grown in a sand-organic soil mix are easier to clean at harvest time.
Clay particles tend to cling together (imagine stacked dish plates). This allows the soil to hold on to water molecules and nutrients important for plant growth. But it can be a nightmare in very dry or wet conditions. Too dry, the clay turns to concrete, resulting in damaged bulbs during harvest. Too much moisture, the clay soil poses other problems. The weight of vehicles, even walking, compacts the particles in soil, making it more difficult for water and nutrients to move freely and for plant roots to develop.
Whether the soil is high in clay, silt or sand, the addition of compost (which contains organic matter) will improve the soil condition for growing garlic. Before planting, add two inches (five centimetres) of manure or other composted material, mixed into the soil with a shovel or garden fork (an implement with four tines.) Compost adds nutrients and organisms important to your soil ecosystem. It also retains moisture, especially important for sandy soil. This is a good excuse to start composting your kitchen waste if you’re not already. Consider raised beds if the soil is heavy, in order to facilitate drainage.
Plant Cloves in the Fall
PURCHASE SEED GARLIC: Do not use imported table garlic for planting. Not only will it grow poorly, but you risk the possibility of infecting your garden or farm field with foreign-based diseases. No self-respecting garlic grower wants to be known as the Typhoid Mary of Ontario garlic. Planting garlic from stock produced near your growing zone is better acclimated than bulbs ordered from out of province. Garlic bulbs suitable for planting—seed garlic—can be found through mail order, at garlic festivals and in farmers’ markets from late July until October.
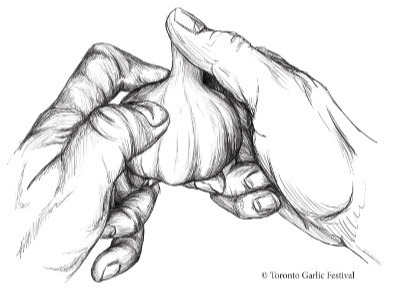
“CRACK” THE GARLIC: Each head or bulb of garlic is cracked or opened to release the individual cloves for planting. Each clove, once planted, will grow into a mature garlic plant. To crack a bulb of garlic, hold it in both hands, stem facing up. Pierce the skin with one thumb, using the other thumb to lever the stem back and forth. Once you’ve removed one clove, the others will easily break off the basal root plate. With a little practice, you’ll find the sweet spot on each bulb. It’s preferable to crack bulbs as close to the time of planting as possible. Be sure to leave many layers of skin (also known as “wrappers”) intact on each clove.
PLANT THE CLOVES: Once your bulbs are separated into cloves, they’re ready for planting. Plant in the fall, before the first frost. Garlic cloves can vary considerably in length from a quarter inch to an inch or more (0.6 to 2.5 centimetres), so it’s recommended to use a planting depth that’s relative to the length of the clove. Use a trowel to dig a hole at a depth of three to four times the length of the clove. Place the clove in the hole, pointy end facing up and flat end down, and cover with soil. Soil depth is measured from soil surface to tip of the clove. In heavy and clay soil, plant at three times the length of the clove. In loose or sandy soil, plant deeper—four times the clove length. Plant each clove six inches (fifteen centimetres) apart. Pat soil firmly.
Plant rows at a distance of ten inches (twenty-five centimetres) between rows. Plant in straight rows, as this makes it easier to weed in the spring if using a hoe or mechanical weeder. A simple way to create straight rows is to tie each end of a string to a stake and align the string in the row intended for planting. Pull the string tight and push the stake at each end into the soil. Once your row is planted move the string and stakes to the next row.
MAKE A MAP: If you grow more than one type of garlic, don’t forget to mark each section with bamboo poles, wooden stakes or other suitable markers. Since they can be displaced over the winter by wind, animals and heavy rain (or, as one gardener lamented, kids on toboggans), it’s recommended to draw a map of your garlic patch, with the length of each section indicated on the map. Keep it in a safe place.
PLANTING IN THE SPRING IS AN OPTION: The ideal time to plant garlic is in the Fall, using bulbs harvested the summer before. Some gardeners ask if they can plant garlic in the Spring using bulbs from the prior year’s harvest. Garlic planted in the Spring will produce a mature plant in the summer harvest a few months later but with a smaller bulb. Even though the bulbs are smaller because the plant had fewer days to grow to maturity the cloves from the bulb can nevertheless be planted in the Fall. The following year they will grow into mature plants. The other option, to wait until Fall to plant bulbs from the prior year, carries the risk that the bulbs may not last until Fall. The reason for this is that, with a few exceptions, bulbs that have been in storage for a year or more will likely rot or dry up, and therefore be of little to no use as seed.
Mulch for Winter
Cover your planted garlic with mulch, using weed-free straw, leaves or shredded newspaper. Mulch should be twelve to eighteen inches (thirty to forty-five centimetres) deep. Newspaper or leaves, although readily available, may form a thick mat, impeding young garlic plants. To prevent this, check in early spring to see if some layers should be removed. Mulch serves several functions. Although the ground will likely freeze solid during the winter months, mulch lessens the damaging effect of sudden changes in temperature. In the spring and summer, it suppresses weed growth and helps retain moisture in the soil by blocking the sun’s rays. Come spring, don’t be surprised to find snakes, toads and nesting birds hanging out in your mulch, snacking on insects, including potential garlic pests. These animals are a natural pesticide. As the mulch breaks down over the season, it contributes to the organic content of your soil. A snow cover also serves as mulch, although by spring it will have melted into the soil. Be prepared to do some weeding.
Spring Chores
APPLY FERTILIZER: If your location gets less than four hours of direct sun per day, work compost or vegetable fertilizer into the soil beside the row in mid to late April, when the plant starts to grow rapidly. Does the soil need water? Here’s a simple test. Take a small handful of soil from your garlic patch and shape it into the size of a marble. Squeeze it. If it does not crumble, it has enough moisture. If water squeezes out of the ball, it has too much. For this test, be sure to gather soil from a few inches below the soil surface.
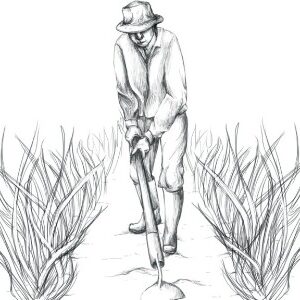
WEEDING: A typical acre of topsoil contains millions of weed seeds—they can lie dormant in the soil for decades. The garden hoe—developed 2,000 years ago—is one of the best tools to manage weeds. A quick pass with a hoe agitates the soil surface, disrupting newly sprouted weeds. Check the weather forecast before weeding—it’s recommended to weed prior to a dry period, when the sun and heat will ensure that uprooted weeds shrivel up

SCAPING: Hardneck varieties produce a scape. If the scape is left on the plant, bulb size may decrease because energy is diverted to bulbil production. Remove the scapes by snapping or cutting them immediately after they’ve curled twice and before they straighten out. You may want to wear gloves, as snapped scapes produce a small amount of sap that can cause a mild burning sensation on the skin.
Summer Harvest and Curing
The harvest is when the mature plant is dug up from the soil. Garlic should be harvested when the tip of three to five of the leaf sheaths have turned brown. It means theplant has reached its maturity and is starting to decay. Why do the leaves provide a clue when to harvest? Each leaf is part of a structure that serves different functions, from photosynthesis to structural support for the stem, to providing a protective layer for the bulb. Because the leaf sheath and covering on the bulb are part of the same structure, the change in colour is an indicator that the plant has reached peak maturity. Leaving the plant in the soil beyond this point will cause the layers on the bulb to decay. It’s important to preserve as many of these layers as possible—they protect the bulb during curing and storage. Some farmers advise digging up and examining a few test plants before the leaves have started to turn brown, especially in wet weather. Moist soil can cause the layers on the bulb to degrade prematurely. If this is the case, don’t wait for the leaf tips to turn brown. It’s time to harvest.
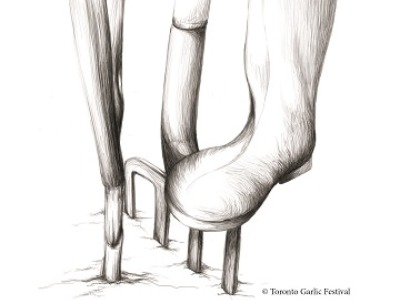
HARVEST: Loosen the soil with a fork, spade or other digging tool, taking care to dig straight down—parallel to the stem of the plant, six to eight inches (fifteen to twenty centimetres) deep and at a distance of three to four inches (eight to ten centimetres) from the stem—far enough not to damage the bulb. Lever the tool back and forth, gently loosening the soil around the bulb. Now, grasp the base of the plant, near to the soil surface. Pull straight up, taking care to not bend the stem, and gently brush off loose dirt and dead leaves, as these can potentially harbour moisture-loving pests and disease during curing and storage. Lay each bulb on the ground. Before digging up too many plants, check your already harvested bulbs to ensure they have not been damaged by your digging implement. If necessary, adjust your digging method with the next plants to be harvested and send those damaged bulbs to the kitchen!
TIE THE PLANTS FOR CURING: Tie garlic plants together in bundles of five or ten (or of your choosing), with a string approximately four feet long—two bundles per length of string. Wrap each bundle twice around using a wide-diameter string, such as hemp rope, to lessen the possibility of cutting into the stem of the plant. Tie tightly to avoid having plants slip out of their bundle—the stems will shrink as they dry. Each set of two bundles is hung by the string to dry or “cure.” Remember, a cut or bruise in the stem or in the leaf sheaths that cover the bulb can allow fungus, mould or other undesirable organisms into the plant.
CURING: Immediately after harvest, garlic is hung to cure for two to three weeks. This allows moisture to escape and prepares the plant for long-term storage. Hang garlic bundles in a shaded, ventilated locale. In places with high humidity, set up a fan.
CUT THE BULBS FROM THE STEM: After curing, use household scissors to trim the roots and gardening cutters to cleanly cut the bulb from the stem. Most growers cut the stem very close to the bulb, in part because any amount of stem left behind can pierce adjacent bulbs while in storage. For bulbs that have tight-clinging skins and are difficult to crack, such as the Music strain (a porcelain variety), farmer Patrick Carter prefers to leave about two inches (five centimetres) of the stem on the bulb, as this makes it easier to crack the bulb in preparation for planting.
STORAGE: Table garlic (for eating) stores best in a cold room or cellar, or in a clay garlic keeper. Avoid storing in higher humidity, or in temperature extremes, such as near a stove or sunlit window sill. Table garlic stored at room temperature may dehydrate faster. Do not refrigerate garlic!
Depending on the variety and strain, garlic can be stored for up to one year. The variation is due to inherent factors in each type of garlic, such as the tightness of the skin on the bulb. No matter the variety of garlic you grow, how you handle the plant during growing, harvest, bundling, curing and storage affects how well the bulbs will store. Since the leaf sheaths covering the bulb serve a purpose similar to human skin—protecting the bulb from potentially damaging organisms—you should ensure that as many sheaths as possible remain on the bulb after harvest. Bulbs with tight-clinging leaf sheaths will likely store the longest. Bulbs with exposed areas on their surface should be the first to be eaten (table garlic) or planted in the fall.
More Information
CITY GROWING: Growing garlic in the city presents special challenges. If your garlic is planted in containers, there’s the risk of sudden freezing. Garlic farmer Bart Brusse suggests using a container that’s at least thirty gallons (approximately one hundred litres) in volume. “A smaller container can also be used if it’s insulated from the cold. Keep it inside a garage or cold room in the basement as long as the temperature is below ten degrees Celsius (fifty degrees Fahrenheit). If kept outside (against a wall helps), cover the whole container with a good insulator—bags of leaves, straw or an insulating blanket such as natural coir (made from coconut husks) or even an old blanket.” If the container is on the ground, it will receive some latent heat from the ground. If the container is on a balcony or deck, insulate the bottom. Finally, garlic is not afraid of heights, but plants on a high floor in an apartment building or condominium will be exposed to high winds and possibly colder temperatures—a few extra layers of insulation are recommended.
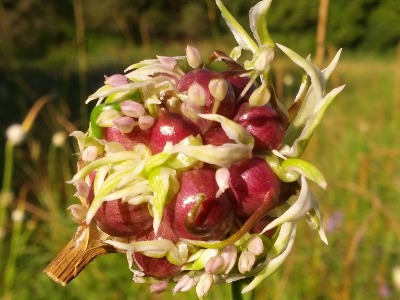
BULBILBS: Bulbils are an inexpensive alternative to planting from bulbs. Bulbils are found in the scape of hardneck garlic. They are tiny, undivided bulbs as small as a grain of rice or as large as a chickpea (see garlic bulbils in pod in color section). They don’t carry any known pests or disease (although they may harbour viruses) and are a low-cost way to grow out your garlic crop. To gather bulbils for planting, farmer Paul Pospisil recommends leaving garlic plants in the ground, with scape still attached, for a week or two after your other garlic plants are harvested. Remove the bulbils from the scape and store in a dry place until planting time. If you grow more than one type of garlic, be sure to label your bulbils. They’re planted at the same time as garlic cloves, two inches (five centimetres) deep, and may be planted directly into the soil.
Grower Paul Pospisil recommends planting bulbils in containers with sterilized soil or potting mix to protect them from soil-borne disease. Bury the containers in the garden, slightly raised above the surface. Cover with mulch and take care to weed and water the following spring. Harvest the young plants at the same time you harvest your other garlic. In the first two to three years, the plants will produce small “rounds”—small undivided bulbs (no cloves). Replant the rounds each fall. Within two to five years, they’ll produce a mature garlic plant with a fully formed and divided bulb. The Purple Stripe variety can produce a mature plant in as soon as one year.
Why plant bulbils in sterilized, disease-free soil? The quick answer is that it buys time. All plants, including garlic, are susceptible to disease and pests in the soil. Some of these organisms can harbour in the plant from year to year, remaining dormant until the right conditions occur for them to grow. Growing bulbils and rounds in sterilized soil helps ensure that the mature garlic plant, once planted into the field or garden, will be disease free. In other words, they are given a head start compared to if they had been planted into soil that potentially contains disease and pests.
Ask your seed source or consult a crop specialist with the Ontario Ministry of Agriculture, Food and Rural Affairs (OMAFRA) on how to manage pests. Know the source of the garlic seed you are purchasing. Some farmers plant some of their crop every year with seed virtually free of disease and viruses. This “clean seed” was developed by the University of Guelph with support from OMAFRA and is available to members of the Garlic Growers Association of Ontario (GGAO).
PEST AND DISEASE PREVENTION: Fortunately, mammals are not especially interested in garlic, but they can be an indirect nuisance. Squirrels will dig in the soil, looking to bury acorns, and in the process may uproot garlic. The real threat to garlic is smaller and more menacing. Insects and diseases present a serious and often hidden threat. Beware of penicillium mould, bulb and stem nematode, white rot, fusarium, basal plate rot, aster yellows and the leek moth. None of these will make it to the eleven o’clock news, but they are a garlic farmer’s worst nightmare. Each manifests in a different way and at different times in the garlic lifecycle.
Penicillium mould causes garlic to decay during storage. When infected bulbs are cracked for planting, airborne mould spores can infect healthy cloves, with potentially damaging results.
Bulb and stem nematode is a microscopic parasite that enters through the root plate or wounds in the bulb. It can lie dormant in the plant until the right conditions arise—it travels well in wet conditions, when it moves from plant to plant, including on a hapless gardener’s boot.
The leek moth is an insect pest that lays its eggs on the leaves of garlic. Once hatched, the larvae tunnel into the plant’s leaves, leaving it susceptible to bacterial or fungal diseases.
Here are a few common-sense practices as the first line of defense against such threats. Conduct regular inspections during the growing season, culling weak and stunted-looking plants and disposing plant material well away from the field or garden. Practice crop rotation, allowing three to five years between planting of any allium species or plants that are susceptible to the same pests and diseases as garlic. Avoid walking in your garden or garlic field in wet conditions, as your boots (or garden equipment) can transfer water- loving pests from one area of the field to another. For more details with photos try these sites:
Diseases of Garlic – Plant Disease Diagnostic Clinic, Cornell University
GARLIC GROWERS ASSOCIATION OF ONTARIO: The GGAO promotes awareness and understanding of growing garlic in Ontario. For a nominal annual membership fee, the association runs meetings and field days two to three times per year. Members benefit from timely talks given by scientists from the OMAFRA and have the opportunity to learn from other farmers. You don’t have to be a grower to join the GGAO.
GARLIC FESTIVALS & FARMERS’ MARKETS: Garlic festivals, held annually from August to September across the province, provide information on growing garlic. And you’ll find a friendly and informative farmer with tips on growing garlic at any of the hundreds of farmers’ markets across Ontario, from Kenora to Kingston. A good source of information on growing garlic is the Garlic News. Editor and garlic guru Paul Pospisil publishes four issues per year from his garlic farm in Maberly, Ontario.
Information excerpted from Ontario Garlic: The Story from Farm to Festival (History Press), available online and in many Ontario libraries.